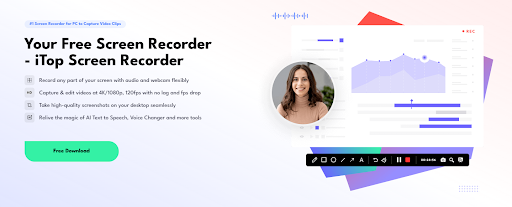
Whether you’re creating tutorials, recording online meetings, capturing gameplay, or producing reaction videos, one thing is certain — clear audio matters. Many users struggle to record both internal system sound and microphone audio at the same time, especially on Windows. Fortunately, iTop Screen Recorder offers a simple, stable solution that lets you capture your screen and blend internal and external audio effortlessly.
Before diving into the step-by-step guide, let’s take a look at a few standout features that make iTop Screen Recorder an excellent choice for anyone who needs high-quality recording with flexible audio control.
Why iTop Screen Recorder Works So Well for Multi-Audio Recording
iTop Screen Recorder isn’t just a basic screen capture tool. It’s built to give creators, gamers, educators, and professionals the freedom to record anything on their screen — with crisp audio and smooth video quality. Here are some of its key strengths:
1. Flexible Screen Recording With Internal and Mic Audio
You can record your entire display, a selected window, or a custom area — all while capturing system audio, microphone input, or both at the same time. This makes it ideal for:
- Narrated tutorials
- Online course recordings
- Gaming sessions with live commentary
- Video reactions
- Meetings and interviews
The best part? The program keeps both audio sources in sync automatically.
2. 4K/1080p Recording at Up to 120fps
Whether you’re recording a fast-paced game, a presentation with transitions, or detailed software demonstrations, iTop Screen Recorder supports up to 4K resolution and 120fps. You get sharp visuals and smooth motion without lag or frame drops.
3. Instant High-Quality Screenshots
If you ever need quick captures while recording — maybe a key slide, a funny moment, or a reference point — the built-in screenshot tool lets you grab them instantly.
4. Powerful AI Tools
iTop Screen Recorder adds creative possibilities with its AI features:
- AI Text to Speech
- AI Voice Changer
- AI Noise Reduction
These are useful for editing narration, enhancing clarity, or adding personality to your video.
Step-by-Step Guide: How to Record Video with Internal and Microphone Audio
Now that you know what the tool can do, let’s walk through the full process of recording both system sound and microphone audio at the same time.
Step 1: Download and Install iTop Screen Recorder
Visit the iTop official website:
Click Free Download, install the program, and launch it. The interface is simple and won’t overwhelm you with unnecessary settings.
Step 2: Set Up Your Recording Area
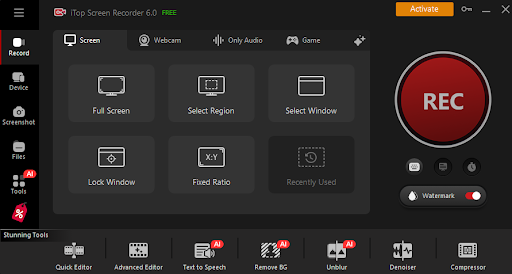
On the main screen, choose how much of your display you want to capture:
- Full Screen – captures everything
- Select Region – drag to choose a specific portion
- Select Window – record only a specific app
For tutorials or gameplay, full screen usually works best. For presentations or small demos, a window or custom region helps keep focus on your content.
Step 3: Enable Internal Audio
To record system sound (e.g., game audio, video sound, notification tones):
- Make sure the Speaker is turned ON
- Select your output device (e.g., headphones, speakers) if needed
iTop Screen Recorder will capture exactly what you hear from your PC.
Step 4: Turn On Microphone Recording
To record your voice:
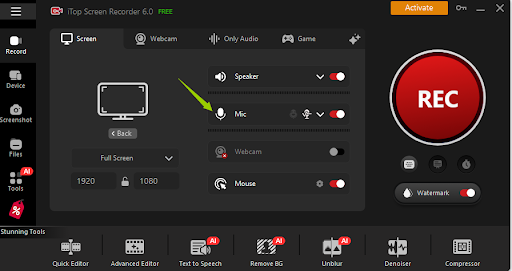
- Toggle the Microphone button to ON
- If you have an external mic or headset, click the small arrow to select it
This ensures your audio commentary or narration is recorded clearly.
Tip:
If you’re recording tutorials or teaching videos, using a USB microphone improves clarity dramatically.
Step 5: Adjust Volume Levels
Before hitting record, test your audio levels.
Make sure:
- System audio isn’t too loud
- Your voice doesn’t peak or distort
- Background noise is minimal
iTop Screen Recorder also offers noise reduction, which helps remove keyboard sounds or room echo.
Step 6: Fine-Tune Video Settings (Optional but Helpful)
Go to Settings → Format.
Here you can choose:

- Resolution: 1080p or 4K
- Frame rate: 30fps, 60fps, or 120fps
- Video format: MP4, AVI, MOV, MKV, or FLV
If you’re capturing gameplay or screen demos, 1080p 60fps is a great balance of quality and file size.
Step 7: Start Recording
When everything is ready, click the REC button.
A short countdown appears, and then your screen, system audio, and microphone audio begin recording simultaneously.
While recording, you can use hotkeys for convenience:
- F9 – Start/Stop
- F10 – Pause/Resume
- F11 – Screenshot
This is especially helpful if you’re presenting, gaming, or narrating live.
Step 8: Review, Edit, and Enhance Your Video
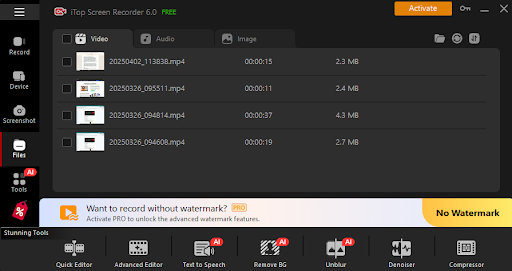
Once you stop recording, your video appears in the Files.
Here you can:
- Trim unwanted parts
- Add text or subtitles
- Apply filters
- Use AI Text-to-Speech
- Apply voice effects with the AI Voice Changer
These editing tools make it easy to polish your content without downloading another app.
Step 9: Export and Share
After editing, export the video in your preferred format and quality.
Upload it to:
- YouTube
- TikTok
- Google Drive
- Social media
- Online course platforms
Or simply save it as a personal archive or training material.
Tips for Better Audio Recording
To get the most out of dual-audio recording:
- Use a decent external mic when possible
- Close noisy apps or browser tabs
- Turn off notifications
- Lower the background music so your voice remains clear
- Do a 10-second test recording before the real session
A few small adjustments can instantly improve production quality.
Final Thoughts
Recording both internal audio and microphone audio doesn’t have to be complicated. iTop Screen Recorder makes the process straightforward, even for beginners. With flexible recording modes, high-quality video output, and built-in AI tools, you get everything you need to create polished, professional-sounding screen recordings.
Whether you’re creating tutorials, gaming commentary, training materials, or reaction videos, iTop Screen Recorder gives you the tools to capture clear visuals and perfect audio — all in one place.
If you’re ready to start creating better videos, download iTop Screen Recorder and try it for yourself.